Monday, November 29, 2010

so much to do, so little time!

did i explain that the diana mini comes with a nice little book entitled "shoot forever"? i didn't think so. well, i have been shooting forever. it seems like it, at least. it's been 2 weeks and i still haven't managed to take 72 photos. is that terrible? before you answer: in my defense, my bathroom has been torn apart, rebuilt, we had thanksgiving, and i started a new job. yes, all that over the course of the past 2 weeks!

and! here is a link to my new etsy store, the wishing well. click pic.
yeah, made this. it's in the shop! also, i'm selling these on december 4, 2010 at the pleasant gap united methodist church.
for A LOT less than i'm trying to sell them for on etsy.


Wednesday, November 17, 2010

Trials and Tribulations!

So, the bathroom is {still} on its way to being finished. Nick and I have been working into the wee hours of the morning on the baseboards, the shoe moulding, and sanding and patching some spots on the walls.
I will post the final pictures when the job is complete! I want you to see the full effect all at once!

You know how my parents gifted us that generous sum of cash for the remodel? Well I stupidly thought it would be enough to *finish* the bathroom. We've got about $300 extra into the deal at this point, and probably still have some odds and ends to purchase. There have been a couple unexpectedly needed trips to Lowe's and Home Depot, but I guess that's life, right?

Anyway, I do have some exciting news...I'm going to be participating in a local craft show on December 4th at the Pleasant Gap United Methodist Church! It's the 2nd annual, so I'm hoping for a good turn-out. I'm trying something completely new this time (I suppose that goes without saying), and it's also motivated me to start a brand new Etsy shop. Nothing's listed yet, but I sure did have fun designing my logo!


Etsy shop banner

Business card!

Also, a Diana Mini update: I am a little more than halfway through my first roll of film, and the anticipation is killing me! Hopefully, I'll get through the last of the photos by this weekend, and have them developed next week!

Friday, November 12, 2010

the long awaited arrival of diana mini :)

The USPS guy drove right up my driveway today, which is not normal. I was on my way to Aldi and figured I'd grab the package when I got home.

SHAME on me!

Prior to hauling 4 eco-sacks of groceries into the kitchen, I took a gander at my package. I was quite convinced that it was a Christmas gift I'd ordered for my husband. Grabbing the sharp scissors (they've got blue handles), I sliced through the tape and tore the box open. Sitting pristinely inside was my precious Diana Mini and film! And A DAY EARLY!

You're probably remarking on how ridiculous I am right now. You're absolutely correct.

When hubs came to see why I was squealing with delight, I was carefully unpacking my new camera. We looked at the instructions together, and he helped me to load my first roll of film. With a grin on my face, and no clue what I was doing, I put my coat on and tromped through the backyard and halfway up the ridge, happily snapping photos along the way, and trying my hardest to use the correct setting for each click.

My parents are to arrive tomorrow promptly at 8:15am to help with the bathroom remodel, and I'm quite excited to snap some candids of the process!

Stay tuned for my first photos!

Thursday, November 11, 2010

Remodeling on a Budget!

Hubs and I were ecstatic when we purchased our new home almost a year ago. It had plenty of great attributes, and it was well under in cost what the bank approved us for.

Pros:
Hardwood floors throughout (minus laminate flooring in kitchen, tile in bathroom)
3 Bedrooms
Spacious basement
Detached garage
Paved driveway
New roof
New windows
Pellet stove

Cons:

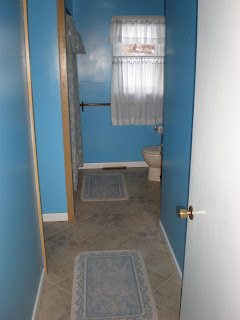
Yes, this is the bathroom. The only bathroom we've got, and this is what it looks like. Not really our taste or style.
I think it goes without saying that something needed to be done here, and fast (my apologies, previous owner!). Luckily, my parents were sympathetic to our situation and offered us $1000 to remodel our lavatory as a wedding gift. Hooray!

We are now on the path to a fresh new bathroom:


Notice that the bathroom has been painted already? That's "Fig" by Eddie Bauer.

Also, I realize it looks like I just stood around and took pictures. Let me assure you that I put in a lot of time with ye olde pry bar. I'm a champion.

The next adventure involves pulling out the old tub/shower unit and replacing it with the new tub. If I'm lucky, I'll have my Diana Mini before the Great Tub Switch occurs!


Wednesday, November 10, 2010

Can I Please be a Photographer?

I love shopping, and my favorite place for this is the world wide web. My husband says I'm always on my laptop, but it's with good reason (most of the time). Here's something I've found just recently, that I needed to have:


Warning: To anyone who's photography-savvy, I'm going to sound like a beginner here. That's because I am one.

This is not a new camera, in fact, according to my research, the Diana camera originated in the 1960s in Hong Kong. Marketed as a toy camera, the first Dianas sold for very little (I have heard costs varying from pennies to a few dollars). Though categorized as a "toy", these plastic cameras are very capable of taking artistically brilliant shots, accomplishing "surprise" effects that some attempt to immitate with photo-editing software. 

Lomography is a great resource for all things analogue. I stumbled across this site during my quest to find out all things Diana, and I discovered that they are responsible for the reproduction of this camera, including the new Diana Mini, which is what I've decided on.

Both the Diana and the Diana Mini come with high reviews, but there were a few factors that I considered before making a decision:

1. I like small things.
2. I am an amateur.
3. I am currently unemployed.

The "amateur" thing was probably the most important. The Diana Mini takes standard 35mm film, and you can still buy this. I really wasn't sure until I checked. The Diana takes 120 film which I hear is more costly to have developed. You can purchase a special attachment for the Diana that will convert it to 35mm, but this costs another $38.

Another plus for the Diana Mini is that you can take 2 different sizes of photos. If you choose to take the standard square photos, you can achieve 36 photos. OR, you can utilize the half-frame option, which will allow for 72 photos on one roll! Yeah!

I panicked a bit when I realized that I purchased the Mini without the flash. The good thing is, the standard flash for the Diana will work for the Mini. I should note too, that I bought my camera along with a 3-pack of Lomography Color-Negative 800 Film. Obviously, I was not going to take my new camera out of its package without something to immediately load it with...c'mon. I bought this film because Amazon "said" it was frequently bought with the Diana Mini. Ok. Other than that, I had no clue what the numbers meant, so I just went with it. It set me back about $13.

I should also note that I Googled some how-tos. There are a lot of tutorials on the web for new users. What I really want is a book that I can physically page through. There doesn't seem to be much of anything, however, but I did order Plastic Cameras by Michelle Bates, for my Nook. It's more Holga-oriented, but it is sufficing.

My Diana Mini is due to arrive in 3 days, and I can hardly contain myself. I'll be sure to post my first experiences, if I can tear myself away from experimenting with it!

Project #3 Feedsack Curtain Valence

Attention: This is a NO-SEW project. Well, you can sew these, if you have a machine. It's not necessary.

I'm also proud to annouce that I did NOT borrow this idea from anyone. Nope. I thought of this all by myself, which might be an indicator as to its simplicity.


I used 2 different 100 lb. vintage feedsacks for this project. I could have used 2 of the same, but matchy-matchy is such a thing of the past. Puh-lease! Purchased these at my local antique consignment center for about $10 each. I probably didn't save too much money doing this, but guess what? I couldn't find a valence like this in a store. Depending on your rod length, you may need less or more feedsacks.

Supplies:

Appropriate number of feedsacks.

No-Sew Fabric Glue.  I used Aleene's, that I borrowed from my mom. She glued a patch of upholstery onto a cushion that her dog chewed through, and she swears it won't come off!

Instructions:

Determine how long you want your valence to hang. I took the rod off of the wall and just folded the sacks over it until I was satisfied.

I kept the rod in place, and applied a line of glue several inches above the rod, and folded the feedsack over. Don't glue too close to the rod...you don't want to glue the fabric to it!

Let the first feedsack dry in place before doing the next. I waited overnight, but I'm sure it's not necessary to wait that long. Glue the next feedsack in the same fashion. I laid everything out on the floor before gluing the second feedsack to ensure that both would hang at equal lengths.

Once both feedsacks are dry, you can hang your valence! Easy as pie.

If you need to have a more secure valence, go ahead and sew. But, I'm telling you, the glue works just fine!


Project #2 Sticky Roll in a Jar

Here's a project inspired by notmartha. Once you start baking things in jars, you can't stop. You just wait.

Prior to my baking adventure, it seemed that cobblers, pies, and cakes were among the most tried-and-true of the jarred edibles world. Now you can add the Sticky Roll to your arsenal.


The Original Sticky Roll in a Jar by Gimme Some Shuga!

Add some fancy ribbon and a custom label, and you've got yourself a perfect gift! Try several recipes and make up  a sampler of sweets! (And yes, the "sticky" is on the bottom, waiting to be flipped!)

Some tips:
-Canning jars are necessary for oven use. Otherwise, your glass is going to explode!
-Canning lids screwed into place immediately after baking will seal your sweets for maximum freshness.
-Frosting/icing is best added right before consumption.
-Excellent for shipping in the mail!
-Use a knife and go around the inside of the jar to free cakes or quickbreads for slicing.

FYI- If you're into making some dough (pun intended) on your edibles, research your local laws beforehand. In PA, if you want to sell what you bake at home, you must have your kitchen licensed. I looked into this. And you can't have your kitchen licensed unless you get rid of these guys:

Not an option! Our mini-dachsies enjoying some sun.


Project #1 Mason Jar Pendant Light

Ok, so as I've said previously, I love trying new things. I'd like this blog to be a chronicle of that. I already regret not having more step-by-step photos, but alas, I will describe in detail how to accomplish these projects (or link you to someone who can!), and at least include a photo of the finished project.
I have a very deep-seeded love for antiques and kitschy flea market items, but I don't want them collecting dust on my shelves, which is why I like to make them functional again. In different ways. This is a borrowed idea, so I can't take all of the credit! Read remodelaholic's tutorial (which is much better than mine and with illustrations) or see below for my instructions!

Here is the finished project:


Here's how I achieved this look!

Supplies:

1. Vintage Ball Mason Jar with zinc lid. I used one with an aqua tint, in 16 oz. size. Try an 8 oz. jar for smaller areas. You can find these on eBay, though I found my local antique consignment center more cost-effective. I purchased mine for $2.50.

2. Drill attachment for drilling doorknob holes. Hey, I never said I was a technical writer. Use the smaller 1" attachment.

3. Drill

4. Pendant light kit. I purchased mine at the local Lowe's for $18. You can also purchase these for less on Amazon.com, for around $10 each. Shipping cost not included.

5. Wire strippers, and wire cutter.

6. 1 candelabra style CFL lightbulb of appropriate wattage (usually 40-60 watts). These have a very low heat output and will not damage your jar.

Instructions:

Some zinc lids will have a porcelain or ceramic liner (I'm not completely sure what the material is) and it is in your best interest to remove this. Once removed, use your power drill with 1" doorknob attachment and drill a hole in the cener of the lid.

Unthread the plastic washer-like piece from the pendant fixture, and slide lid on. Afix washer-like piece to hold lid in place.

Twist bulb into socket. Twist jar into lid.

Locate your breaker box and cut the power to your light fixture. Remove existing fixture. Read pendant light instructions on how to hard-wire your new light, and attach new light to fixture!

*You can adjust the length of the pendant by using wire cutters to shorten the drop, and by using the strippers to re-expose the wire.

Isn't the end result Marvelous?!

To Blog, or Not to Blog?

At a recent job interview, I was asked if I'm still writing. I was caught off guard. Did she want specifics? I answered honestly.....yes, I'm still writing. I'm writing grocery lists. I'm writing e-mails. Sometimes, I'm copying recipes that I think my husband and I might enjoy someday. It was all legitimate.

I was feeling uncomfortable and defeated. I wasn't writing like I used to, and the interviewer uncovered something about me that I had pushed to the darkest recesses of my mind. It was then that I began to brainstorm about my next writing endeavor, and so, here we begin.

Beginning something new, I like to have a game plan. I like to know what the end result will be before I even start. I am a self-proclaimed perfectionist. Don't they say that the first step to recovery is admitting you have a problem?

Recovering from perfectionism doesn't really sound plausible to me, but we're not here to talk about psychology. We're here to talk about the things I like to do and how I do them. Usually I would tell you that my hobby is crafting, but more recently, I would just tell you that my hobby is trying new things.

I would also like my hobby to be commiting to blog posts. So we'll see what happens.